fukui astro tweed toque

IMG_8882

Living in Hong Kong is definitely not the best thing for your knitting life. There’s really nothing about a semi-tropical climate that motivates you to pick up those needles, and so my poor little blog has been very quiet indeed.

Luckily, I now find myself in Canada, surrounded by seasons that blissfully mimic those in Japan. Fall is here in all her glory, and I’ve completed my first project in nearly a year!

This hat was made using 2 skeins of Filatrua di Crosa’s Astro Tweed (colour 16). I bought this stuff when I was still in Fukui (hence the name I’ve given the hat). It’s a great Italian yarn that’s 64% wool, 20% polyamide, 16% acrylic, and machine washable. The yarn is also bulky weight, so the whole thing knit up really quickly. What I really love about this toque is how comfy, casual, and instantly gratifying it is; if those are things that interest you, be sure to check out the patten below!

P.S. Isn’t fall in Vancouver gorgeous?!

IMG_8966          IMG_8921

IMG_8989

~ the pattern ~

This is definitely a unisex toque. It’s a little loose (but oh so cozy) on the average woman’s head, and it’s big enough for the average dude. The brim is simply worked in 2×2 ribbing and then folded up. The rest of the hat is just simple knitting and very basic decreases – easy peasy!

Gauge: 4.5 stitches per inch (2.5cm) in stockinette

Using 40cm circular needles, cast on 92 stitches, place a stitch marker, and join for knitting in the round.

Round 1: knit 2, purl 2, and repeat until you reach the end of the round.

Repeat Round 1 until the ribbed brim measures 14cm.

Knit every row until you have 10cm in stockinette stitch.

 Next round: knit 2, knit 2 together, and repeat until the end of the round.

Knit the next 3 rounds.

Next round: knit 1, knit 2 together, and repeat until the end of the round.

Knit the next 2 rounds.

Next round: knit 2 together and repeat to the end of the round.

Cut the yarn (make sure you leave a long enough tail!) and thread it through the remaining stitches.

Double check to make sure you haven’t missed any stitches (I did this the first time… opps) and take the needles out. Using the tail pull the remaining stitches together, secure the tail, weave in your ends, and you’re done!

Photos by Aaron Nathanson

purl bee little baby sweater

sweater-1

I realized that I haven’t blogged about this project yet… I think this was actually the very last piece that I completed in Japan. It’s kind of strange for me to be looking at these pictures now – I really liked using those familiar blue walls as a backdrop – but it’s time to catch-up on all my blogging!

                                                   sweater-2   sweater-3

Right before I left Japan, a teacher I was very close to went on maternity leave. As a farewell gift, I made her this little baby sweater. This was yet another very helpful and easy to follow pattern that I found on http://www.purlbee.com (you can see it here!). This was actually my first time to knit a baby garment, so I really appreciated the detailed pattern.

While the actual brand of yarn I used is long-forgotten, I do remember that it was knit with little skeins of organic cotton yarn (Japanese, of course).

I’m missing Japan a lot these days, but being knee-deep in Christmas knitting certainly helps me to take my mind off of it! Expect many more posts in the coming weeks…

halloween owl hat

owl costume-1

Happy (belated) Halloween! It’s a few days overdue, but I figured I should share this year’s costume. But first, a little bit of news…

As you may have already noticed, I’m no longer “knitting in Japan”. This past August I said sayounara to my wonderful home of four years and relocated to Hong Kong. I miss Japan (and of all my kawaii, quaint, and oh-so-familiar knitting/yarn shops) terribly, but, after two very busy and stressful months, I’ve finally settled in enough to start knitting and posting again.

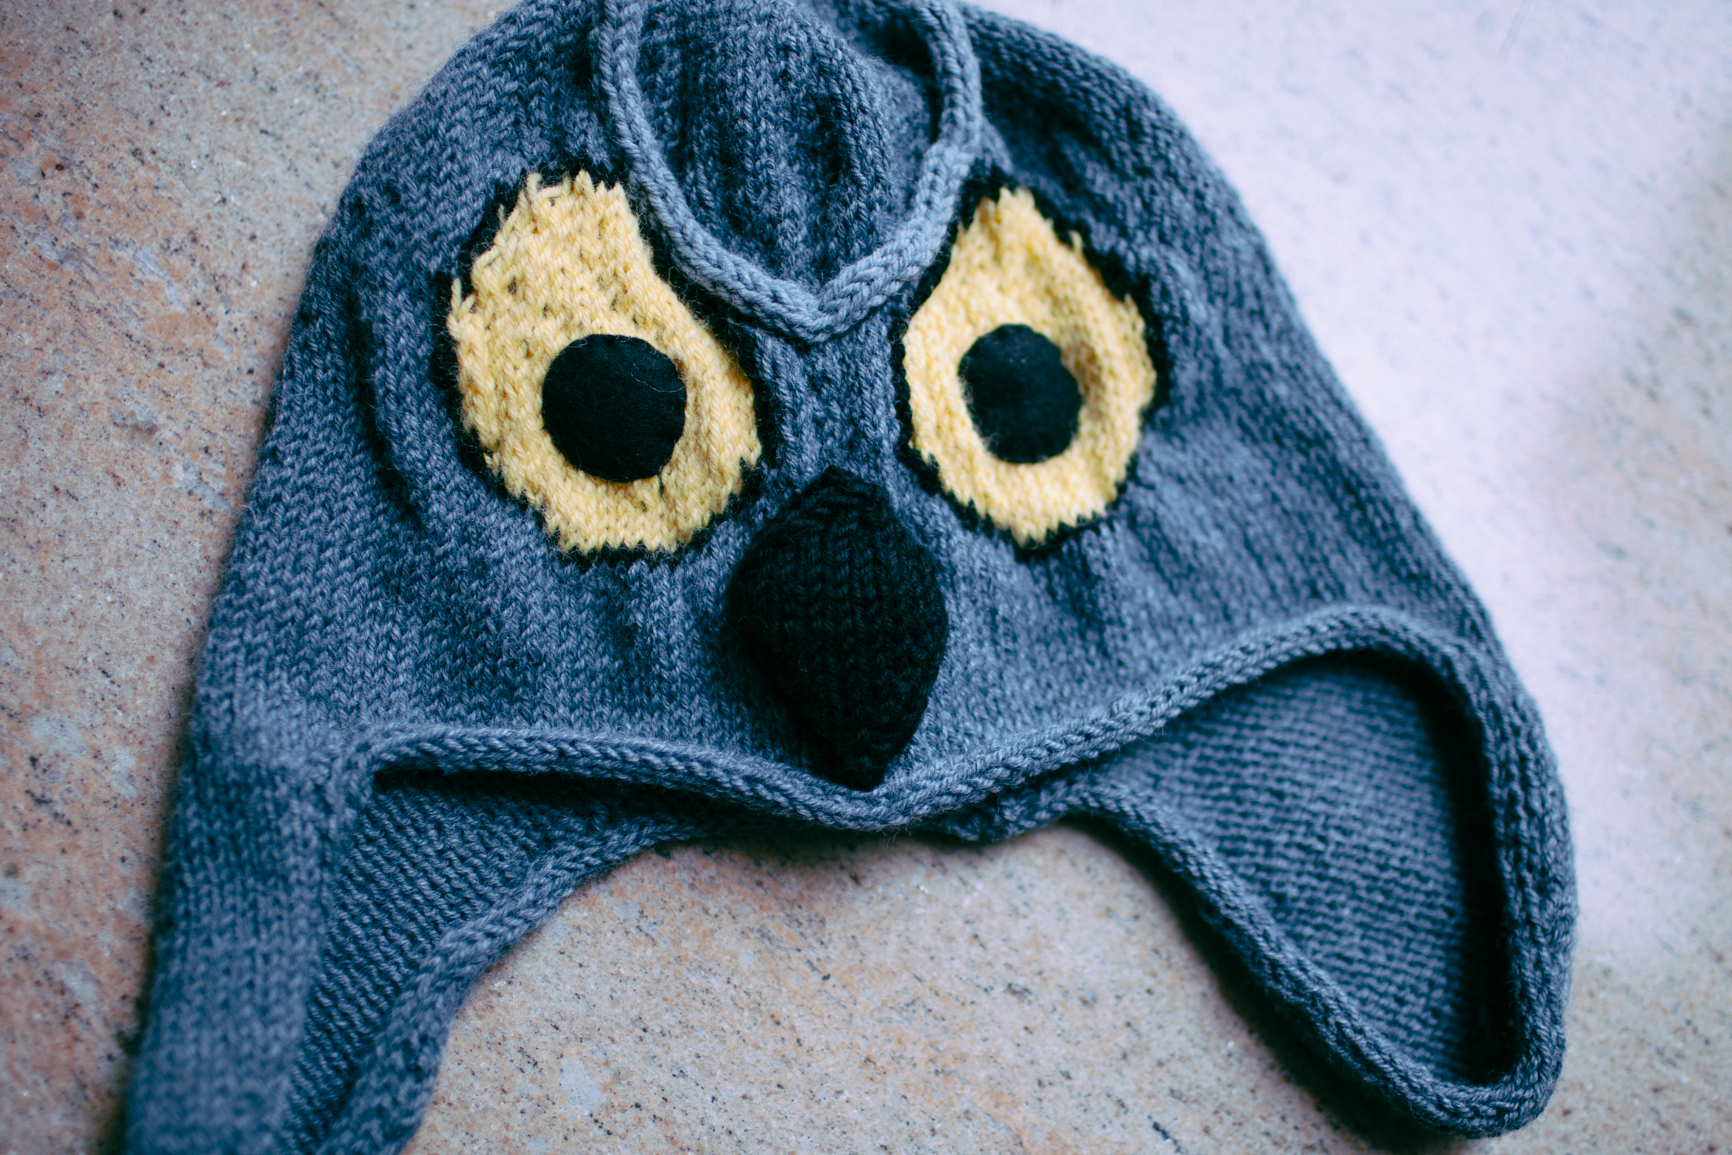
And that brings me to the owl hat…

owl costume-3

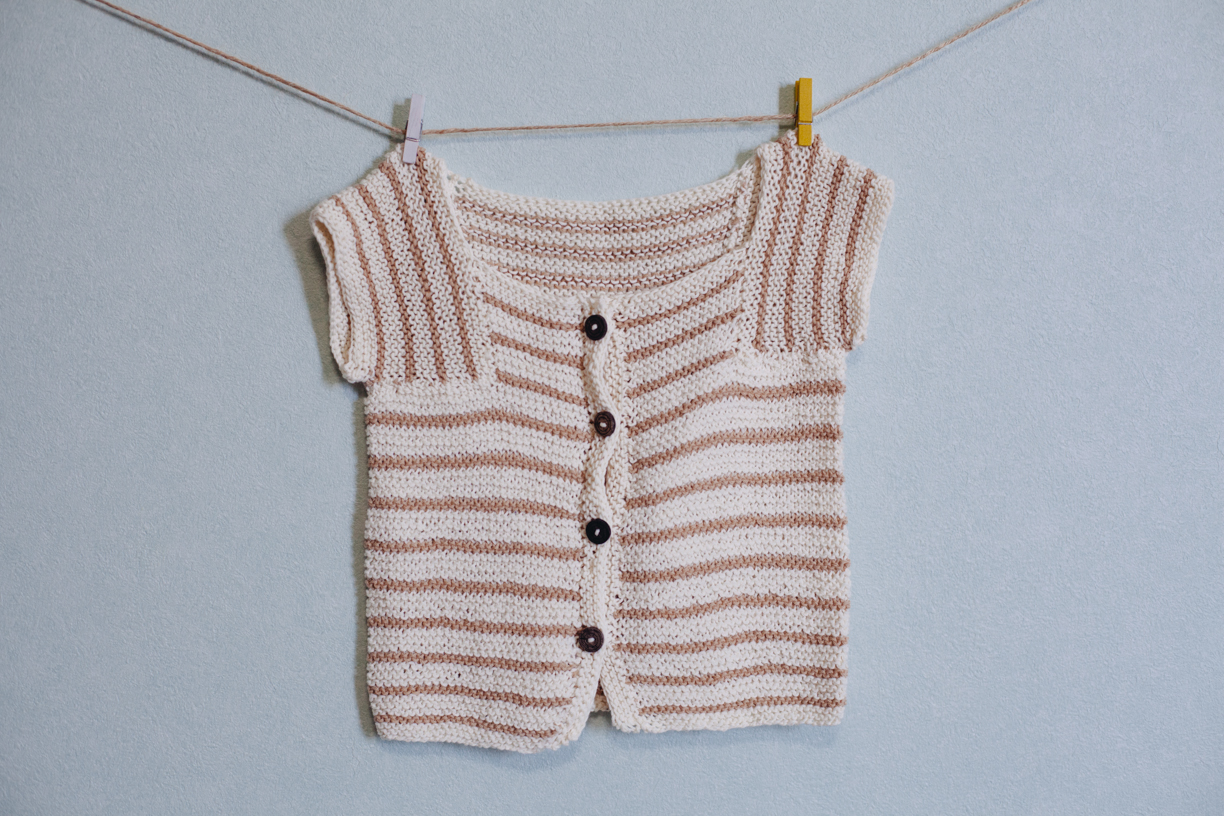
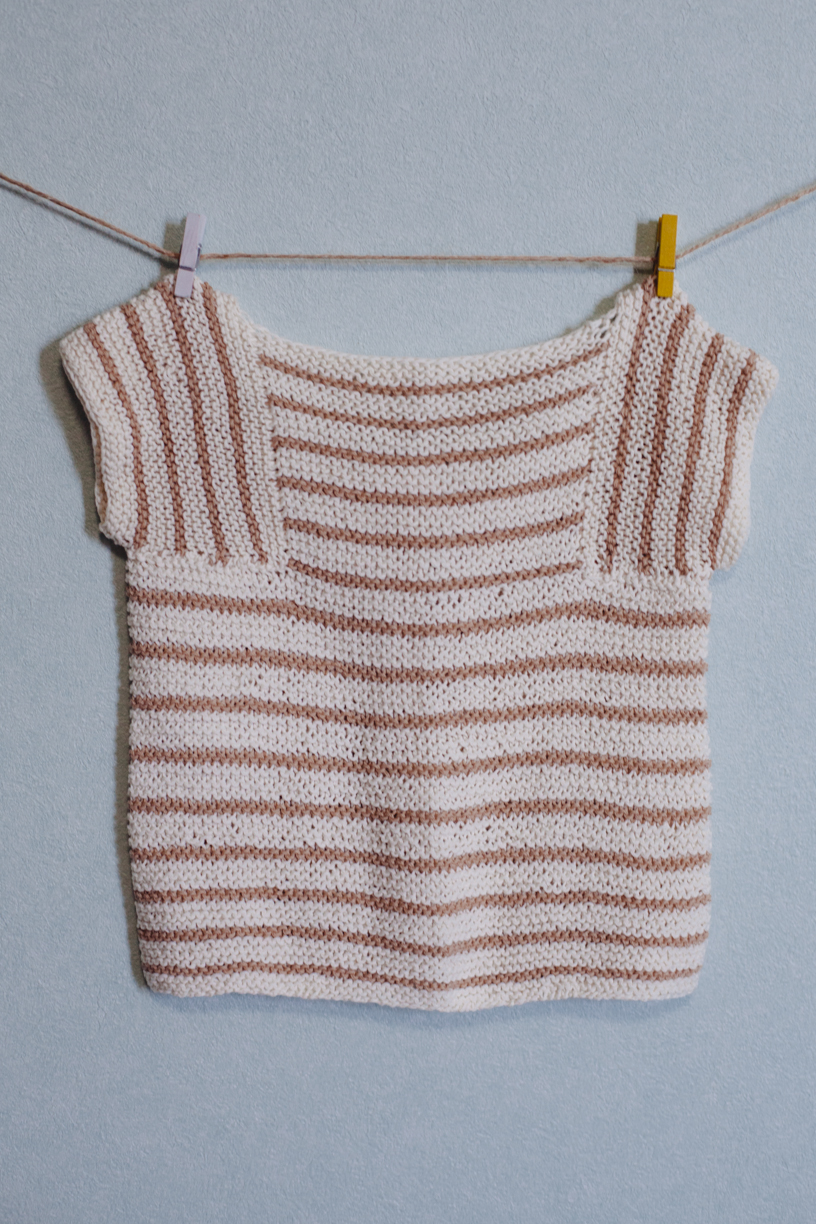
This year’s Halloween was all about about DIY for me. I can’t remember exactly why I decided to be an owl, but I had to be something (mandatory work party) and I was probably searching online for some kind of cheap, knit-able costume. Also, thanks to the move I hadn’t really knitted anything all summer, so I was really itching to get back at it. After deciding on some patterns (I used the pattern for Purl Bee’s Man’s Striped Flap Hat and direction’s from this Owl Hat pattern from Knits ‘R’ us for the eyes, beak, and eyebrows), I ventured out into the unknown to find yarn.

There are quite a few resources online for knitters in Hong Kong, but sometimes shops can be really hard to find. For example, at one point I took a train to Kwun Tong in search of a crafting store, and I flat out gave up looking after fifteen minutes. I had found the old, scary factory building that apparently housed said shop, but I couldn’t find out how to get inside! (I’ve since discovered that you need to walk through a scary car park to get to the scary freight elevators – not the most obvious place to be buying yarn!). One shop that I did manage to find, however, was Filo Kilo. Located only a short walk from Prince Edward MTR station (exit B2, G/F 167 Sai Yee Street), this place was a welcome change to some of the more cramped stores I had found. Not only is Filo Kilo relatively spacious, but it offers a really good selection and the staff is both English-speaking and incredibly helpful. After telling them that I was going to make a hat for Halloween, they concluded that I wouldn’t want high quality stuff and lead me to a really great selection of cheap synthetic blends – exactly what I was looking for! Pretty good service if you ask me!

After procuring the yarn, I whipped up the hat really really quickly. I’m not 100% pleased with the end result (tension issues!!!), but it was definitely a rush job due to the fact that the rest of the costume was a bit of a hand sewing nightmare! This was definitely one of those times where I didn’t consider how much work I was creating for myself…

   owl costume-2       owl costume-4

Buying fabric was an adventure that lead me out to Sham Shui Po, one of the best places to get fabric here. Not far from the MTR are streets lined with fabric shops, many of which are wholesale. The problem with these shops is that a lot of them only have fabric samples displayed on cards lining the walls. What you do is pick what you’d like, order it (usually with a minimum yardage), and then pick it up in a few days. Unfortunately I was only interested in instant gratification shopping (I reeeally didn’t want to have to make another trip out there) and a little scared of the street hawker bazaar (apparently a good place to hunt down cheap fabric), so I pretty much missed out on all the awesomeness this area had to offer. So what did I do? I basically ended up hunting for scraps.

If you wander up and down the fabric streets, you’ll notice that most of the stores have boxes of fabric either right outside the door or somewhere inside the shop. These scraps (which are actually rather sizeable) are super cheap, and after digging through enough boxes I found more than I needed to make my costume.

Once I had my fabric, the real challenge began. I’m a knitter, not a sewer, so this was definitely trail and error for me. I don’t know the first thing about pattern making, so essentially what I did was create a giant sack in the general shape of a tank top. After that, I made a stencil out of a Nature’s Valley granola bar box, traced little chalk “feather” shapes onto the fabric, cut them out, and ever-so-slowly sewed them onto the sack. Needless to say, the hand sewing (no machine here!) took forever. Originally I wanted to make wings, but that idea went out the window pretty fast.

Considering the time constraints and the budget I was working with, I’m fairly pleased with how it all came together. Next year I’ll have to remember to start earlier… that, or just buy something like everyone else!

owl costume-5

news!

It’s a slow day at work, so I thought I’d use this time to write a little update!

For those of you who don’t know, I’ll be leaving Japan in August. This country has been my home for the past four years and means so much to me that I don’t really know how to talk about leaving.  However, what I can say is that, in terms of my crafting life, Japan will always occupy a little spot in my heart because it was where I started knitting and it was where this blog came to be. I’m really sad to be losing my little “Knitting in Japan” header, but I’m looking forward to all the stitches I’ll be knitting elsewhere. I’ve got some really cool stuff lined up for the coming year, so stay tuned!

In other news, my recent abundance of free time has also meant that I’ve been able to work on some orginal designs! I just finished the pattern for a silk tank top that I’m working on, and, if all goes according to plan, I’ll be sharing it with you all in the coming weeks. If it ends up being an epic disater, just forget I said anything. 🙂

tank top design

herringbone cowl

herringbone cowl

As with many other knitting-related things, I first discovered the herringbone stitch through www.purlbee.com. Their big herringbone cowl and mimi herringbone scarf are both absolutely gorgeous, and they inspired me to finally try out herringbone for myself!

 herringbone cowl     herringbone cowl

For this project I used Richmore’s Stame in colour #32. I loved the way this alpaca and merino blend knit up nice and thick but still retained a nice drape. I kind of wish that I hadn’t gifted this one away!!

~ the pattern ~

If you’ve never done herringbone, check out this tutorial first!

Gague: 4 stiches per inch in pattern.

Using a provisional cast on, CO 46 stitches.

Row 1, right side: slip 1 knit-wise, knit one, purl 1, knit in herringbone until the last three stitches. Purl 1, knit 2.

Row 2, wrong side: slip the first stitch purl-wise, purl 1, knit one, knit in herringbone until the last three stitches. Knit 1, purl 2.

Repeat rows 1& 2 until the piece measures 130cm long or desired length. Graft the ends together, weave everything in, and enjoy wearing your beautiful new cowl!